Tasty and mostly simple food for the whole family.

Tasty, healthy, simple, verstile, practical, seasonal, fun food for all to enjoy. I will endeavour to make things gluten-free, dairy-free (cow's milk only here, I'm not super-human), and low sugar as able. I hope others feel motivated to add their recipes to this collection so we can all try them. Thank you!
Showing posts with label Sweets. Show all posts

Thursday, March 5, 2015

Almond Date Bars (gluten-Free/Dairy-Free)

These bars are so decadent tasting!  I am typically loath to deal with chopping and mixing dates due to the high-maintenance nature of the beast, but here I can't get enough.  I find that if I chop them and toss them in the dry mix a bit, then it is easier to use my hands to just break them up a bit.  Heck, this might even make a near-Paleo list if you wanted to get so ambitious to sub in coconut for the oats or something crazy like that.  I have played around with lots of variations in the wet ingredients and all are delish- subbing applesauce for part of the oil and/or part of the honey, agave or coconut syrup for honey.... all good!  Might have to try subbing in some pumpkin next with extra spices. 

These hold up well to freezing for later, but it is critical to make a double batch to allow for this practice, otherwise you wont have enough.  I am amazed at how many of those little crumbs keep needing to be pinched up and gobbled as I walk past the pan.  Suddenly there is only an odd sized piece left, and it always needs to be squared up....  I also imagine that this could be used as a mighty-healthy option for a crumble topping on an apple crisp.   

These have been adapted from a recipe by Deb Perelman from the Smitten Kitchen Cookbook for Almond Date Breakfast Bars.  A great cookbook cover to cover!


Almond Date Bars
  • 1 cup chopped dried pitted dates
  • 1 1/4 cup rolled oats 
  • 3 Tbs flour (I use my AP gluten-free flour blend, any type will do)
  • 1/3 cup flax meal
  • 1/2 cup thinly sliced almonds
  • 1/2 tsp salt (scant tsp)
  • 1/4 tsp ground cinnamon 
  • 1/4 cup almond butter
  • 1/4 oil (see note above)
  • 1/4 honey
  • 1/8 tsp almond extract
Directions
1. Preheat oven to 350deg and line an 8x8 pan with parchment paper. 
2. Mix together all of the dry ingredients in a medium sized bowl.
3. Whisk together all of the wet ingredients in a small bowl (I just measure them all together in a 2c glass measuring pitcher for ease of clean up).
4. Pour the wet ingredients into the dry mix and stir very well to make sure all is well coated, then pour into your prepared pan.  Smash it down hard, pressing into all of the corners and such.  This will help it all stick together later so make sure it is well smushed.
5. Bake the bars 20-25 minutes until browned around the edges and top a bit, then cool completely on wire rack in the pan.

Note: It is best to completely cool before trying to lift out or they may crack a bit, forcing you to perform the aforementioned crumble clean up. Cut into squares and enjoy!


Tuesday, October 15, 2013

Pumpkin Chia Cookies! (Gluten-free/Dairy-Free)

As per usual, I am always trying to maximize my baked goods full of complex grain/seeds, fruits and veggies for my 5-year-old who is a Particular Eater. This is typically easier this time of  year when pumpkin is more on the radar because she loves the complex flavors of pumpkin baked goods.  I have no idea why this works for her delicate palate, but I try just to be grateful. 

Well, now enter the 10-month-old who is a seriously complex eater already, but somehow is low on iron. Ok, so I do actually know that red meat could help, but I've got a thing about handling blood.  I'm much better with this arena.  I put this recipe together to incorporate pumpkin seeds which are a decent source of iron (14% RDA/ 1/4 cup) and then got all excited about using teff flour which is even higher in iron (20%/1/4 cup) and blackstrap molasses (15%/Tbs).  They are really high in protein and fiber for baked goods so the glycemic load is nicely reduced, making this the new Everyday Cookie for us!

These are quite moistureful- unlike many gluten-free baked goods.  Surely you could add some banana in somewhere and if you wish, increase the sugar.  I don't have much of a sweet tooth and the girls have never complained, so I keep it pretty low.  

Pumpkin Chia Cookies  (Makes about 3 dozen 1oz cookies)
  • 3/4c almond flour (I use almond meal from TJs)
  • 1/2c flour (*see note below)
  • 1/4c ground pumpkin seeds**
  • 1tsp cinnamon
  • 1/4tsp salt
  • 1/2tsp baking soda
  • 1Tbls chia seeds mixed with 3Tbls hot water (or sub an egg)
  • 1/3c coconut oil at room temp or butter
  • 1/3c pumpkin (canned or freshly roasted)
  • 1/4c brown sugar
  • 1tsp vanilla 
  • 1Tbls molasses (optional but extra yummy) 
*Flour note: I haven't used wheat flour here at all but presumably it works.  I typically use 1/4c teff flour and 2Tbls each garbanzo/brown rice flour

**I put pumpkin seeds in a standard mason jar and screw the blender bottom on to it and then grind them up for a few seconds, works great to make a flour-like texture.  You could use food processor, blender or serious chopping.
 

Directions (preheat oven to 350deg)
1. Mix chia and water together in small dish and let rest about 10 min

2. Meanwhile, sift together all dry ingredients in medium bowl- this  mixes them and will break down little chunks of nut flours and such that seem to form.

3. Mix together all wet ingredients along with chia/water mixture.  I actually just put them all in my narrow measuring cup and use my immersion blender to mix the heck out of them

4. Combine wet ingredients in with the dry, then scoop 1Tbls drops onto parchment-lined baking sheets, then flatten the cookies a little with your fingers or the back of a spoon.  Bake 12-13 minutes. 

Enjoy!

Tuesday, July 2, 2013

(avocado) Chocolate Pudding Pops! (Gluten-free/Dairy-free)

It is HOT here in Seattle and these are a healthy fudgesicle  must.  I was a little unsure how well they would freeze but they were great!  I would also even make this recipe and just enjoy it as pudding or double it and chill it for a no-bake chocolate pudding pie.  I used the 4-oz cheapo pop makers from Safeway or something- you can use anything you have.  Even pour the mix into ice-cube trays and use tooth pics or Popsicle sticks if you don't have the molds.  

Avocado Pudding Pops (makes 4 3-4oz pops)
  • 2T Cocoa (or Cacao) powder
  • 2T Agave
  • 1/2 soft avocado
  • 1/2 cup silken tofu
  • 1/4 cup milk (I used almond milk)
Directions
Put all ingredients into food processor or blender and puree until very smooth.  Pour into Popsicle molds and freeze.  


Happy Summer!

Monday, June 24, 2013

Healthy Delicious Brownies (Gluten Free/Dairy Free/Grain-Free/Refined Sugar-Free)

These brownies haven't lasted more than 24 hours in our house.  As you will see, they are quite appropriate for breakfast and snacks so they are never long for the world.  And in this house where my oldest kiddo won't eat protein, this is oh, so satisfying!  These are so fast to make and (I think this is a good thing) not too rich.  The recipe I adapted this from used just nuts and no garbs, but I think the texture benefits from the addition of the beans giving it a more moisturefull crumb.  They are a bit reminiscent of Chocolate Chip Blondies.  I Recommend getting enough ingredients to make two batches because they will go fast.

Killer Brownies
  • 1cup raw walnuts or pecans (or try almonds and let me know!)
  •  ⅓ cup cocoa powder 
  • ½ teaspoon baking soda 
  • ¼ teaspoon sea salt 
  • 1cup garbanzo beans, rinsed and drained 
  • 2 large eggs 
  • ½ cup maple syrup 
  • 1 tablespoon vanilla
  • Optional (not optional)- 2-4 Tbls mini semi-sweet choc chips
Directions
 Preheat oven to 350 degrees F. Grease an 8 x 8-inch glass baking dish.

Place the nuts into a food processor fitted with the “s” blade. Process until very finely ground, stopping just before they turn into nut butter. Then add the remaining dry ingredients and pulse again to combine. Add the rest of the ingredients and process again until smooth. You will still have tiny bits of nuts visible- this is OK even if you are a nut-in-your-brownie type like me.

Pour batter into baking dish. Spread evenly into pan with a rubber spatula or spoon and sprinkle on and lightly swirls in the chips if using. Bake for 25 minutes. Cool for about 20 minutes before slicing.

Adapted from The Nourishing Meals Cookbook by Alissa Segersten and Tom Malterre, MS,  CN

Monday, January 21, 2013

Peanut Butter Banana Chocolate Chip Muffins (Gluten-free/Dairy-free)

These super tasty muffins and packed with great sustaining protein and fats making them a perfect quick breakfast.  Also they ridiculously easy to make!  Even my peanut butter loathing daughter thinks they are delish.  However, after the first bite of the first batch, she and Mike bit into their muffs and immediately made haste to the kitchen to manually apply chocolate chips.  Clearly they were correct in their assessment and thus, this recipe strongly suggests the chip application.  Also, in the first batch I made, instead of 2 bananas, I used one banana and about 3/4c left-over cooked oatmeal from these muffins made last week.  I liked them that way, but most of you will enjoy more banana I suppose.  I also like to add a couple of tablespoons of ground flax for lots of reasons- great nutrition, fiber and such- but also flax and psyllium husk are great additions to gluten-free baked goods as they help with the binding that gluten otherwise provides as well as help bind in moisture.  Your option to add or not, they are fine either way.

Ingredients:
  • 1c Peanut butter (Natural)
  • 4 lg eggs
  • 2 bananas (see note above)
  • 1/4c maple syrup
  • 2 tsp vanilla extract
  • 6 Tbsp coconut flour (really any flour should work)
  • 3/4 tsp baking soda
  • 1/2 tsp salt
  • 1/4 cup mini chocolate chips
  • (optional) 2T ground flax seeds/psyllium husk 
Directions:
Preheat oven to 350.  Blend all ingredients except chips in food processor until smooth.  Mix in chips, then divide evenly between 12 muffin tins and cook for ~25 minutes, until toothpick comes out clean.

Enjoy! 


Thursday, September 6, 2012

Pecan Bars (Gluten-free/Adaptable)


I don't like pecan pie.  I don't like pecan bars, pecans in my cookies, pecans in my anything, really.  But really? These are unreal.  The first time I had them was when my amazing colleague and office partner made them for our holiday party last year.  I saw them on the plate and appreciated them for their holiday appropriateness but quietly turned my nose up at them until the party was over and I was simply eating to burn off stress (don't try this at home).  Anyway, they stopped me cold and I couldn't believe how delicious they were.  Not too sweet, perfectly balanced and very special.  They are absolutely loaded with butter and sugar and corn syrup for goodness sake.  These are not Everyday Cookies.  These are not even like bacon as a sometimes food.  These are very special occasion treats, but at least an annual or semi-annual must.  Furthermore, they are super easy and fast to make!


Pecan Bars (Gluten-free)
For the crust:
1 c flour (for gluten-free, I used equal parts oat flour, rice flour, sorghum flour and garbanzo flour)*
1/4 tsp baking powder
1 tsp salt
1/3 c light brown sugar
1/4 c toasted and chopped pecans**
6 T. cold unsalted butter, cut into pieces

For the filling:
4 T melted butter
1/2 c light brown sugar
1/3 c light corn syrup
2 tsp vanilla
1-2 T bourbon or dark rum (I used rum- yum!)
1/2 tsp salt
1 large egg, beaten lightly
1.75 c toasted and chopped pecans**
*I loved the oat flour here, but really encourage you to choose any flour combination you have access to.  You could use an all-purpose blend or your favorite custom mix.  I will likely up the oat flour next time to half-cup and see what strikes me from there.

** I found that at Trader Joe's, they sold a bag of chopped raw pecan pieces that was exactly 2 cups!

Preheat oven to 350 degrees.  Line a 9in square baking pan with two layers of tin foil, positioned at 90degrees to each other and long enough to be used as "handles" to lift the bars out of the pan.  Spray the tin foil with non-stick cooking spray if not using non-stick foil.

In a food processor, put the first 5 ingredients and pulse to mix.  Then add the butter and pulse a little more. This should take the shape of maybe coarse corn meal. Pat the crust into the bottom of the pan and pat until firm.  Bake for 20 min until golden brown.

While the crust is baking, whisk together everything else, except the egg and pecans.  Then whisk in the egg. Pour the filling on the crust, then sprinkle with the pecans.  Bake 22-25 min until the top is browned and bubbly/slightly cracked.  Cool for about an hour.  Lift the tin foil out of the pan and cut into bars.

Thursday, April 5, 2012

Banana Chocolate Chip Oatmeal Muffins (Gluten/Dairy free/adaptable)


When I made my first batch of these the other week, I thought Mike was going to float off the ground.  I mean, don't get me wrong, Mia was pretty pumped for the choco chips and all, but my husband after the first (of 4) muffins....."MMM!!  Oh!  These have to go on the blog."  (pause, one more muffin)  .." MMM!  and make sure to tell them that you used cooked oats. You used cooked oats, right?"  And so on.  For those of you who don't know my husband, he is a man of few words.  For those of you who do know him, you probably don't even believe me, but these are actual quotes with actual accentuation to them.  He was even (after the 3rd batch or so about 3 days later) prompted to send me a cherishably,  rare mid-day text stating "what are the odds the last two will be here when you get back from work?".  I'm pretty sure I'm on to something here.  Never mind that they are absolutely delicious for big and small peeps, totally packed with goodness, full of whole grains, no refined sugar and suuuuper easy and fast to make.  I think I timed it at 20 minutes from first measure to out of the oven, as long as your oats are cooked already. 

If you make the gluten-free version, depending on your flour choice, these could seriously be practically a complete meal- just missing maybe 1/4 cup of squash puree or something and they would be perfect.  Use some brown rice and bean flour, fruit?  Jim Gaffigan would agree, these are truly Muffin Vitamins.


Banana Choc Chip Oatmeal Muffins
(preheat oven to 400deg)
1c cooked oats
1egg (or flax egg)
1Tb melted butter or coconut oil
1/2 c milk (I use almond milk)
4Tb liquid sweetener- I typically use Maple syrup
1tsp vanilla
1-1/2c flour (any kind is fine, I use a mix of garb, brown rice, tap starch and sorghum)*
1Tb baking powder
1tsp salt
4T mini choc chips (1/4c)
1 banana chopped very finely

* if using GF flours, I use 1tsp ground psyllium husk or 1Tb ground flax.  Often I use some flax as a part of the flours anyway)

Directions:Mix dry ingredients together.  In separate bowl, mix the wet stuff then combine it all together.  Scoop 2oz (I use ice cream scooper) into 24greased or lined mini-muffin tins and bake for about 12 minutes.  

Consider making extra oatmeal to make the next batch tomorrow.

You may also want to add other nuts and dried fruit and such to your muffs if that is your thing.  It is most certainly NOT mine, but I know your type.
If you want to make regular sized muffins, this will probably make about 8-12 muffs, depending on how much you fill the tins.  Cook for maybe 18-22 min?
2oz ice cream scoop is magic!


Muffin and child to scale.

Friday, March 30, 2012

Crispy Granola Bars (gluten-free/dairy-free)

This recipe came out of a recent need to have granola in the house.  As a recovering child of a hippie, granola wasn't actually a staple- it was considered junk food.  Right along with Grape Nuts and other shocking foods of the like.  Don't get me wrong- it isn't lost on me that I resent all of the organic whole foods and recycling that my mom thrust upon me decades before it was cool- yet I have wholly embraced it as a person and parent.  I just have to live with that.  Anyway, for some reason I have just been craving granola.  A good friend of mine, (Our CarolMerrill), gave me a recipe a year or so back and I finally got to making it.... then Cooks Illustrated put Granola in their recent issue and I felt it was a sign.  As with many things Cooks Illustrated, it sounds great but there are just too many steps to make it perfect- So basically this is a recipe inspired by CI and friends, then a recipe gone wrong in a very yummy way. 

Crispy Granola Bars
  • 2c reg oats
  • 1/4c coarse flour- oat flour or almond flour work great
  • 1/2c crispy (brown) rice cereal(whole foods has a good 365 brand for pretty cheap)
  • 1/4tsp salt
  • 1tsp vanilla
  • 1/4c nut butter of your delight (see note)
  • 1/4c sweetie: I used 2T agave and 2T maple syrup
  • semi-optional: 2-4T mini chocolate chips 
  • optional: 1-2T flax meal, 1T chia seeds or what ever you love to add (nuts, seeds, dried fruit....).  
Nut butter note: my favorite has been to use Sunflower Butter or Almond Butter because of their mild flavor.  When I have made these with Peanut Butter, I have simply found them too Peanut Buttery if you know what I mean.  Mike loved them that way but he is funny like that.

Directions: (Preheat oven to 350deg)
1. Mix dry stuff in one bowl
2. Mix wet stuff together in a separate bowl (as with the Breakfast Cookies, I just build it in a wet ingredient measuring cup)
3. Mix together and smash the heck out of them into a parchment lined pan (really smash them) and cook ~10-12 minutes depending upon if you want a chew or crunch factor.
4.  Let cool for 15-20 minutes before cutting.


Thursday, March 15, 2012

Oatmeal Raisin Breakfast Cookies (Gluten-free/Dairy-free)

So these are basically granola bar drops or something.  They will pass as a cookie if they have to (say, if you are trying to get healthy food into your kids *ahem*) but they really are a nutritional snack (and therefore totally OK to eat if, say,  you have given up sweets and treats for Lent as some folks I know).  They are ridiculously easy to make,  totally packable and a great bite to keep you going in a pinch.  The 'recipe' below is absolutely just a suggested combination of ingredients. I would certainly encourage you to add nuts if you like, add dried cranberries, coconut, whatever. Clearly, the above batch was greatly helped by Mia this morning who felt strongly about having goldfish, O's and Honey Sunshine included.  I was just happy they didn't burn, but can't possibly imagine how unpleasantly soggy those fish will be tomorrow. 

I typically just literally pile everything into my 2c wet measuring cup, just adding stuff as I go- start with the applesauce, add peanut butter, then just dump it all in after that, adjusting the oats or whatever I choose to plop into them as I see fit to have the mix the consistency I like.  I am not one who likes much moisture in my foods, so I tend to put more oats and such in to keep them dry and cook them a long time.  If you prefer a more moistureful item, go a little scant on the oats and take them out a few minutes earlier.  I actually tend to keep them out on the counter uncovered to dry and stale out a bit.  I have issues.

Oatmeal Raisin Breakfast Cookies
  • 1/2c unsweetened applesauce (our mix of applesauce, mashed banana &/or squash puree is good, too)
  • 1/4c nut butter of your liking
  • 1/4tsp cinnamon
  • 1/2tsp vanilla
  • 1/8tsp salt
  • 1Tbls sugar, agave or maple syrup
  • 3T raisins (I greatly prefer currants here)
  • 3/4-1cup whole oats
  • 2-3Tbls mini chocolate chips (optional, but really....)
Directions (preheat oven to 350deg)
As I said above, I just dump all of the ingredients into a 2c measuring pitcher and mix.  I would mix the nut butter and and applesauce first to get it well combined, then add the rest and adjust to your taste.  Then drop in 1oz/1Tbls blobs on a parchment lined cookie sheet and cook 18-20 minutes.  Let cool a few minutes before transferring to wire rack to cool.

Adapted from this recipe at Chocolate Covered Katie.

Tuesday, December 20, 2011

Gingerbread Cut-outs (Wheat-free/Dairy-Free)


Gingerbread cookies are my absolute favorite.  I have never made them before this year because I am almost blinded with resentment of the refrigeration step.  This process is so ridiculous, so heinous, that I simply have never made them.  There is just something about thinking "mmm, I'm going to make some cookies" and "Oh, wait, let's not even think about eating them until tomorrow" that is ... well, you get it.  Anyway, this year I have had an attitude adjustment called 'raising a toddler'.  In this complicated step of life, one reevaluates what one defines as fun and thinks "hey, that might be fun to make them at night and then we can cut them out tomorrow!" in addition to many other redefining moments, of course.  Plus, I clearly under use my Kitchen Aid mixer, as this machine basically makes cookies on its own with a bit of coaching.  All of these years.  Anyway, I was right.  It was totally fun to cut them out and play with Mia doing the cookies once I got through the rolling out process which nearly broke me- but only because I skipped that silly step of rolling it out before refrigerating it.  Incidentally, I don't recommend you skip that step.

So this recipe was adapted from a recipe in The Allergen-Free Baker's Handbook (yes, I adapted a perfectly good GF recipe and added gluten), so you could easily replace the spelt flours with your favorite GF flour and 1tsp xanthan gum if you like.  These cookies have great flavor, are super soft with a just-right chew and were exactly what I wanted, especially since this was  my first foray into baking with spelt.  Good stuff.  Low sugar, much lower in fat than typical cookies and great ingredients with the whole grain flour and molasses make them right good mama/toddler snacks.

Spelt Gingerbread Cut-out Cookies
  • 3-3/4c Spelt flour (I used 2c reg and 1.75c white spelt)
  • 3/4 tsp baking soda
  • 1 tsp salt
  • 1 Tbls ground cinnamon
  • 1 Tbls ground ginger
  • 1 Tbls ground cloves
  • 1/2 c vegetable shortening, cut into about 8 pieces
  • 1/2 unsweetened applesauce
  • 1/2 light agave nectar
  • 1/4c plus 2Tbls molasses
Directions
1.  In the bowl of a stand mixer fitted with a paddle attachment, combine the flour mix, baking soda, salt, cinnamon, ginger and cloves.  Mix on low speed until combined, about 30 sec.  Stop the mixer and add the bits of shortening and the applesauce, then mix on low speed for about 1-1/2 minutes or until consistency of fine meal.

2.  With the mixer still running, add the agave and molasses, mixing until thoroughly combined, about 20 more seconds.  (if you use a food processor instead, add ingredients in order mentioned, process for about 10 seconds per step)

3.  Lay out two large sheets of parchment paper on your work surface.  Using spatula, divide the dough evenly between the two sheets.  Cover each with another large parchment sheet and roll out with rolling pin until ~1/4" thick.
4.  Wrap in plastic and transfer the dough in the parchment paper to the fridge until completely chilled, preferably overnight or at least a few hours. 

5.  Preheat oven to 350.  Line two baking sheets with parchment paper.

6.  Remove one dough from the fridge and peel back one sheet of parchment paper, then replace it and flip the dough over.   Remove the new top sheet of parchment paper and start cutting shapes!

7.  Transfer cut shapes onto baking sheet about 1" apart and bake on center rack for ~10 minutes.  If you like, you can use raisins and such before baking to decorate.

8.  Save all scraps around your cut-outs and re-roll for more cookies as many times as you like.

9.  Let cookies cool completely if you plan to decorate with your favorite frosting.

Makes about 3 dozen cookies of mixed sizes.  A pretty big batch if you ask me.


This video was made while making some GF snickerdoodles to post another time, but is clearly an excellent alternative mixing method.

Monday, December 12, 2011

Gluten-Free Sugar Cookies


I know, the picture is clearly not a sugar cookie.  It is gingerbread and I will have a recipe for the tasty soft and delightful low sugar spelt gingerbread cookies soon, but really.... Is that maybe the best decorated cookie you have ever seen?  With the spur?  I don't even know how you eat that one.  Anyway, some friends and I got together for a cookie decorating party this weekend.  I was responsible for the Gingerbread variety and The Great Leslie Beck was responsible for the sugar cookies.  Since I am the one with special needs, I made a wheat-ful batch and a spelt batch, but I never expect others to bother.  TGLB, however, is always thinking of the peeps around her.  She made regular sugar cookies and these amazing Gluten-Free Sugar Cookies.  She adapted them from this recipe based on necessity and I will post the recipe as she made it below because they were amazing. I'm sure the original is amazing as well.

I feel like people always want to apologize for things being Gluten-Free.  Really, the only thing that I find typically needs and asterisk is bread.  Other than that, wheat is boring, boring, boring.  Gluten-free grains have way more complexity and flavor.  These cookies are the most delicious sugar cookies I have ever tasted.  Light, delicate and tons of flavor to stand up to delicious butter-cream frosting.

Note:  Leslie used a GF all-purpose mix by Avec Baking that was incredible.  If you are in Seattle, you can find it at PCC.  If you are not in Seattle, please think of this local company for an order. This flour was excellently balanced and xanthan-free.  If you are using your favorite GF mix in this recipe, please make sure it isn't just rice flour and tapioca starch or the flavor of your cookie will be very neutral.  If need be, replace at least 1/2 or 1cup of the flour you are using with either sorghum flour or amaranth flour to boost the personality.  I happen to also love garbanzo flour, but I know that is scandalous.  If you are making your own mix, please use 1.5 cups flours and 1 cup starches, like potato and tapioca.

Gluten-Free Sugar Cookies
  • 2 & 1/2 cups Gluten-Free All-Purpose Flour mix (please see note above)
  • 2 teaspoons baking powder
  • 1/2 teaspoon salt
  • 8 tablespoons (1 stick) unsalted butter, at room temperature
  • 1/2 cup sugar
  • 2 eggs
  • 2 teaspoon vanilla extract
  • pinch fresh nutmeg
Directions

1. Place all the flours in a medium-sized bowl and whisk them together (if not using pre-mixed). Sift them through a fine-mesh sieve into another bowl. Add the baking powder, and salt, then whisk together and set aside.

2. Stir the butter (or let the beater attachment of the stand mixer do it for you). Add the sugar and cream them together until they are just combined. Add the two eggs and vanilla extract and beat for a couple of minutes more. Throw in the pinch of nutmeg and stir one last time.

3. Sift the dry ingredients into the wet, one cup at a time until well mixed.  It should be a thick batter, not entirely stick to the touch, but not as stiff as traditional rolled cookie dough. Wrap in plastic and refrigerate overnight.

4. Preheat oven to 375 and take the dough out of the refrigerator and let it come to room temperature. Don’t let it reach complete pliability. The dough should still be rather stiff from the refrigeration.

5. Roll out the cookie dough between two pieces of parchment paper. This dough doesn’t go paper thin, so you’ll have cookie with a bite to them. Cut out with your favorite shapes.

Bake for 8 to 12 minutes, depending on your oven and how crisp you like them. Let them cool for 10 minutes before eating them. Let cool completely before using your favorite butter-cream frosting for fancy decorations!

Makes about 15 to 20 cookies, depending on the shapes.


Sunday, October 16, 2011

Banana Applesauce Muffins (Gluten & Dairy-free adaptable)


Actually, I made these into mini muffins.  The mini muffin is a curious item.  So cute and tasty, anyone would want to pop one in.  Or six.  Thankfully, Mia is no different from the rest of us in this department.  A muffin is a fabulous way to pack a billion tasty and nutritious things into a tiny package and feel good about what  you are selling and who you are selling it to.  The mini muffin just makes it easier. 

I didn't put any grated zucchini or carrot in these today out of sheer laziness, but you certainly could add a cup or more in when you mix the batch together.

And a note on gluten-free here.  Never before has gluten free shined brighter than in the quick-bread.  Really.  Any quick-bread recipe you read always says to 'not over mix' or 'mix just until dry ingredients are wet' and such.  This is so you don't over activate the natural gluten in typical flour.  With gluten-free flours, you can go to town and skip the xanthan gum.  They turn out great!

Banana Applesauce Muffins
  • 2 cups flour (you choose your type*)
  • 1tsp baking soda
  • 3/4 tsp baking powder
  • 1/2 tsp cinnamon
  • 3/4 tsp salt
  • 1/2 cup sugar (I used 1/4c brown sugar & 1/4c agave syrup)
  • 1/3 cup milk or vegetable oil (I used almond milk)
  • 1-1/2 tsp vanilla extract
  • 1 Tbls lemon juice
  • 1 cup mashed banana
  • 2/3 cup apple sauce
  • 1 egg, lightly beaten
* for my gluten-free flour today, I mixed 1/2 cup each buckwheat, garbanzo, brown rice flour with 1/2c potato starch.  You can use what ever you want here!

Directions:

1.  Preheat oven to 350deg.

2.  Combine all dry ingredients in a bowl and whisk together well to fully blend.

3.  In separate bowl (I just use a 3 cup wet measuring cup), mix all wet ingredients together, then pour the wet mix into the dry ingredients and combine.  Again, if you are using standard flour, avoid over mixing.  Gluten-free?  mix it up. 

4.  Pour into greased muffin tins (or papers). See cooking times/amounts below:

Makes:
42 mini-muffs (filled cups), cook 11-13 minutes
14-16 standard sized muffs, cook 20-22 minutes
1 loaf pan, cook maybe 45-55 min?

Let cool in pan 5-10 minutes before transferring to cooling rack.

Mini-muffin, shown to scale in my hands.  So darn cute!

Mia appraises her mini.  Again to scale.

Tuesday, August 2, 2011

No-Bake Oatmeal Cookie Balls (Gluten-free/Dairy-free)


These are tasty little numbers adapted from a recipe given to me by Mia's Naturopath, Dr. Molly Gray.  We love her and everyone else we have seen at their clinic.  Dr. Gray has been especially amazing in how she treats Mia like a full human and makes her visit there extremely positive and cooperative, vs. doing things to her whether Mia wants them or not.

So these were supposed to be a yummy treat that Mia would love to eat and just pack her with nutrients and such, but it turns out she wasn't into them.  Toddlers, right?  But me?  I absolutely loved them!  Being the food enthusiast/Physical Therapist that I am, I brought them to work and shared them with my colleague and about half of my patients and unanimously we all agreed that they were amazing!  To borrow from Cooks Magazine: "Tasters referred to them as 'delicious', 'abundently satisfying' and 'just right, such that you eat one and are completely sated'".  Really, try them for yourself if you have an extra 3 minutes to spare.  That is all it will take.  Bonus, these are the kind of thing that you could put just about anything into and in fact, I used the little bits of about 4 different types of nuts and trail mixes just to clean the cupboard. 

Oatmeal No-Bake Cookie Balls
  • 1 cup whole oats (use certified gluten-free if needed)
  • 1c mixed nuts (I used salted pumpkin seeds, walnuts, pecans and pine nuts)
  • 4 dates, pitted
  • 1/2-1 tsp pure vanilla extract
  • 2-3 Tbls pure maple syrup
Directions
1) in food processor or blender, blend up the oats and nuts until they are finely chopped; add dates and blend until they are also finely chopped.

2) add vanilla and 2T syrup and pulse a few times to combine.  This will still be very coarse in presentation (see photo below).  Add more syrup as you see fit.

3) scoop up small hand fulls and smash into balls.

Pulsed without vanilla or maple syrup

with the vanilla and maple
 
too beautiful not to add a picture of them!  Reminds me of working on a Kibbutz many moons ago....

scoop up a handful....
and smash it into a ball!


Enjoy!!

    Thursday, June 23, 2011

    Mango Banana Recovery Ice Cream (Dairy Free)


    Are you running in the Rock & Roll Half/Full Marathon this weekend in Seattle?  If so, please do consider this as quite possibly the BEST recovery snack to have in your first 30 minutes after running to replenish your depleted nutritional resources.  Seriously, this is perhaps the most perfect post-race food and totally delightful at the same time. 

    Not to mention the fun for me of finally talking my daughter into the fact that ice cream is delicious and fun, even though it is cold.  Hard to be ice cream without the cold part.  Anyway, now she is totally into it and I can take heart in the fact that this ice cream is full of fresh fruit and calcium rich almond milk and juice.  That's it!  Also, feel free to play with the fruit and juice you toss in to work with whatever is in your freezer.

    Of course this is good for an everyday ice cream treat as well!

    Mango Banana Recovery Ice Cream

    1 banana, frozen in pieces
    3/4 cup or so frozen mango pieces
    2-4 Tbls Almond milk (or any other milk-type... rice, soy, cow....)
    2-4 Tbls Orange Juice (optional)

    Directions:

    In high powered blender or food processor, toss in the banana and mango, then add a few tablespoons of  almond milk (I just put in a long drizzle).  Start the blender or food processor going and slowly add a tablespoon (or glug) at a time of milk and/or juice.  Use more milk to make it ice creamier and more juice to make it creamsickle-ey-er.  Then scoop it into your favorite delivery item.  Mia is a fan of the cone and they make perfectly good gluten-free cones to be had at any grocery store these days.  Or any other cone, or cup, or cookie....

    Makes about 3 good sized servings.  I recommend immediate consumption for a good soft texture, but it does freeze well for later eating if for some unrecognizable reason you can't finish it all.

    Beautifully smooth!

    Can you argue with that?

    Sunday, June 19, 2011

    Raspberry Oatmeal Bars (Gluten-free)


    I am a huge fan of having guest bloggers here on Fawnalicious.  So far only Katie has with her fantastic Basque Red Bean Soup. I have been super busy lately getting the new PT clinic up and running so have barely had chance to cook for myself and the family, much less write about it.  So this brings us up to today's delicious recipe from the Great Auntie Bert.  Now, while everything that follows is her creation, this is my blog after all and therefore I get to take a moment to talk about her. 

    Bert is a special friend, colleague, godmother and 'Auntie' to our daughter.   I hope beyond hope that anyone reading this has friends like her.  She is one of those friends that makes your life easier by just being a part of it.  Anyone who knows her is aware of the love and generosity she brings to those she spends time with.  She makes being a parent a little easier with each visit shared.  And now she comes through again with the following recipe which she happens to have talked big about for weeks now, but I have never tasted since they get gobbled up by anyone who comes close to them.  Now I will make them my darn self.


    From Bert:

    "This is a lovely treat, which is super easy and can be a little more sweet or less sweet depending on how you might choose to adapt it. It has been used a breakfast bar in a pinch, or a pre-exercise snack.

    Prep time 10 min, bake time 30 min, and they freeze well~

    Makes 16 bars

    I am not a stickler for following recipes and this with this one you can get away with that behavior for sure!

    Bert’s Gluten-free Raspberry Oatmeal Bars

    • 1 1/4 cups gluten free flour
    • 1 tsp. ground cinnamon
    • 1/2 tsp. baking soda
    • 1/4 tsp. salt
    • 1 cup light brown sugar
    • 1/2 cup (1 stick) unsalted butter, softened
    • 1 large egg
    • 1 tsp. vanilla extract
    • 1/2 tsp. almond extract
    • 2 cups old-fashioned rolled oats, divided
    • 1 cup raspberry jam
    • 1 large handful of choc chips 43% cacao (optional, although why wouldn’t you!)
    • 1 medium handful of walnuts chopped, (optional)

    Directions

    1.Preheat oven to 350°F. Coat 9-inch-square baking dish with cooking spray.

    2.Combine flour, cinnamon, baking soda, and salt in large bowl.

    3.Cream sugar and butter until light and fluffy. Beat in egg and vanilla and almond extracts until smooth. Add flour mixture to butter mixture; mix until combined. Stir in 13/4 cups oats. Spread 2/3 of batter on bottom of prepared baking dish. Spread raspberry jam over the batter with back of spoon.

    4.Add remaining 1/4 cup oats to remaining batter. Crumble over top of raspberry jam. Bake 30 minutes, or until golden. Cool, then cut into bars.

    Bert's fav gluten-free AP flour blend

    In the mix!


    (adapted from many sources…..)"

    Monday, June 6, 2011

    Chocolate Chip Blondies (Gluten-free/Dairy-Free)


    I was quite intrigued when I stumbled on this recipe the other day.  It looked tasty, but garbanzo beans?  Yes! I have been amazed at how delicious these are and how versatile.  The original recipe doesn't have oats in them and I found them to be a bit too Japanese-bean-cake-like for what I was going for, so I have added in oats along with a few other minor changes and like what they bring, although the day after I made the first batch, they were a much better texture.  The oats allow for immediate enjoyment, however.  And this is FAST!  I can have the batter made before the oven preheats.  Doesn't even cut into precious nap time barely at all.  Furthermore, this is the only way I can sneak peanut butter into the wee one and just about the only source of protein she eats anymore. 

     Chocolate Chip Blondies
    • 1 1/2 cups garbanzo beans (1 can, drained and rinsed)
    • 3/4 tsp baking powder
    • 1/8 tsp baking soda
    • heaping 1/8 tsp salt
    • 2/3 cup brown sugar* (less if you like, even Mia thinks 1/3-1/2c is fine)
    • 1 tsp vanilla extract
    • 3 or so Tbls ground flax (optional but great for nutrition and texture)
    • 1/4 cup peanut butter (or other oil or soft butter if not using nut butter)
    • 1/4-1/3 cup chocolate chips ( I use mini chips because they go further)
    • handful of oats (maybe ~1/4cup?) 
    • splash of milk (I use almond milk.  love it) Maybe 2-4 Tbls?  See below
    *coconut sugar works well in these as does raw sugar and the like
     
    Directions

    Preheat oven to 375 degrees. Blend all ingredients except chips and oats until very smooth- I have used both a blender and a food processor.  Add the (almond) milk a small splash at a time into the blender to ease the mixing and lesson the chance of busting your blender (or your host's blender as the case may be).  Mix in chips and oats, and scoop into a greased or parchment lined 8×8 pan. Bake for 33-35 minutes.  I find that in the batches that I add oats to, the cooking time is on the shorter end.  Without the oats, they stay quite a bit gooey-er and need the longer end.  They will be super gooey when they first come out, but will firm up, so don't be tempted to overcook them!

    (Note for amended recipe with milk: I find this really helps reduce the excessive gooey-ness, yets keeps it modestly moistureful).
    Why wouldn't you just mix the oats and chips in the pan?


    And why not a double batch?

    Adapted from this recipe by "Chocolate Covered Katie"

    Saturday, February 12, 2011

    The Chocolate Chip Cookies

    I feel pretty sure that these just may be the best ever chocolate chip cookies ever in the whole wide world.  They have completely allowed me to get my Chocolate Chip Cookie Confidence back, which had been deeply damaged for years.  Since I have only slightly adapted this from a Cooks Illustrated recipe in the May/June 2009 issue, I can say this without any ego involved.  You will have to try them to confirm, but I look forward to the feedback.  They are absolutely full of all things gluten, dairy, sugar, egg and you-name-it, and should never be stripped of their very necessity in creating this harmony of sweet success. 

    The need for me to find this recipe had been deep and long-lasting.  Many lifetimes ago, I actually used to be a good baker- even baked for a few different restaurants - but I went a desperately long decade+ with rock-bottom Chocolate Chip Cookie Confidence.  Year after year of crispy, hard, nasty attempts had left me but a puddle of pathetic memories and almost pure fear-avoidance behaviours when the thought of trying again came along.  If I hadn't been able to make Oatmeal or Snickerdoodles, I may not have made it at all. 

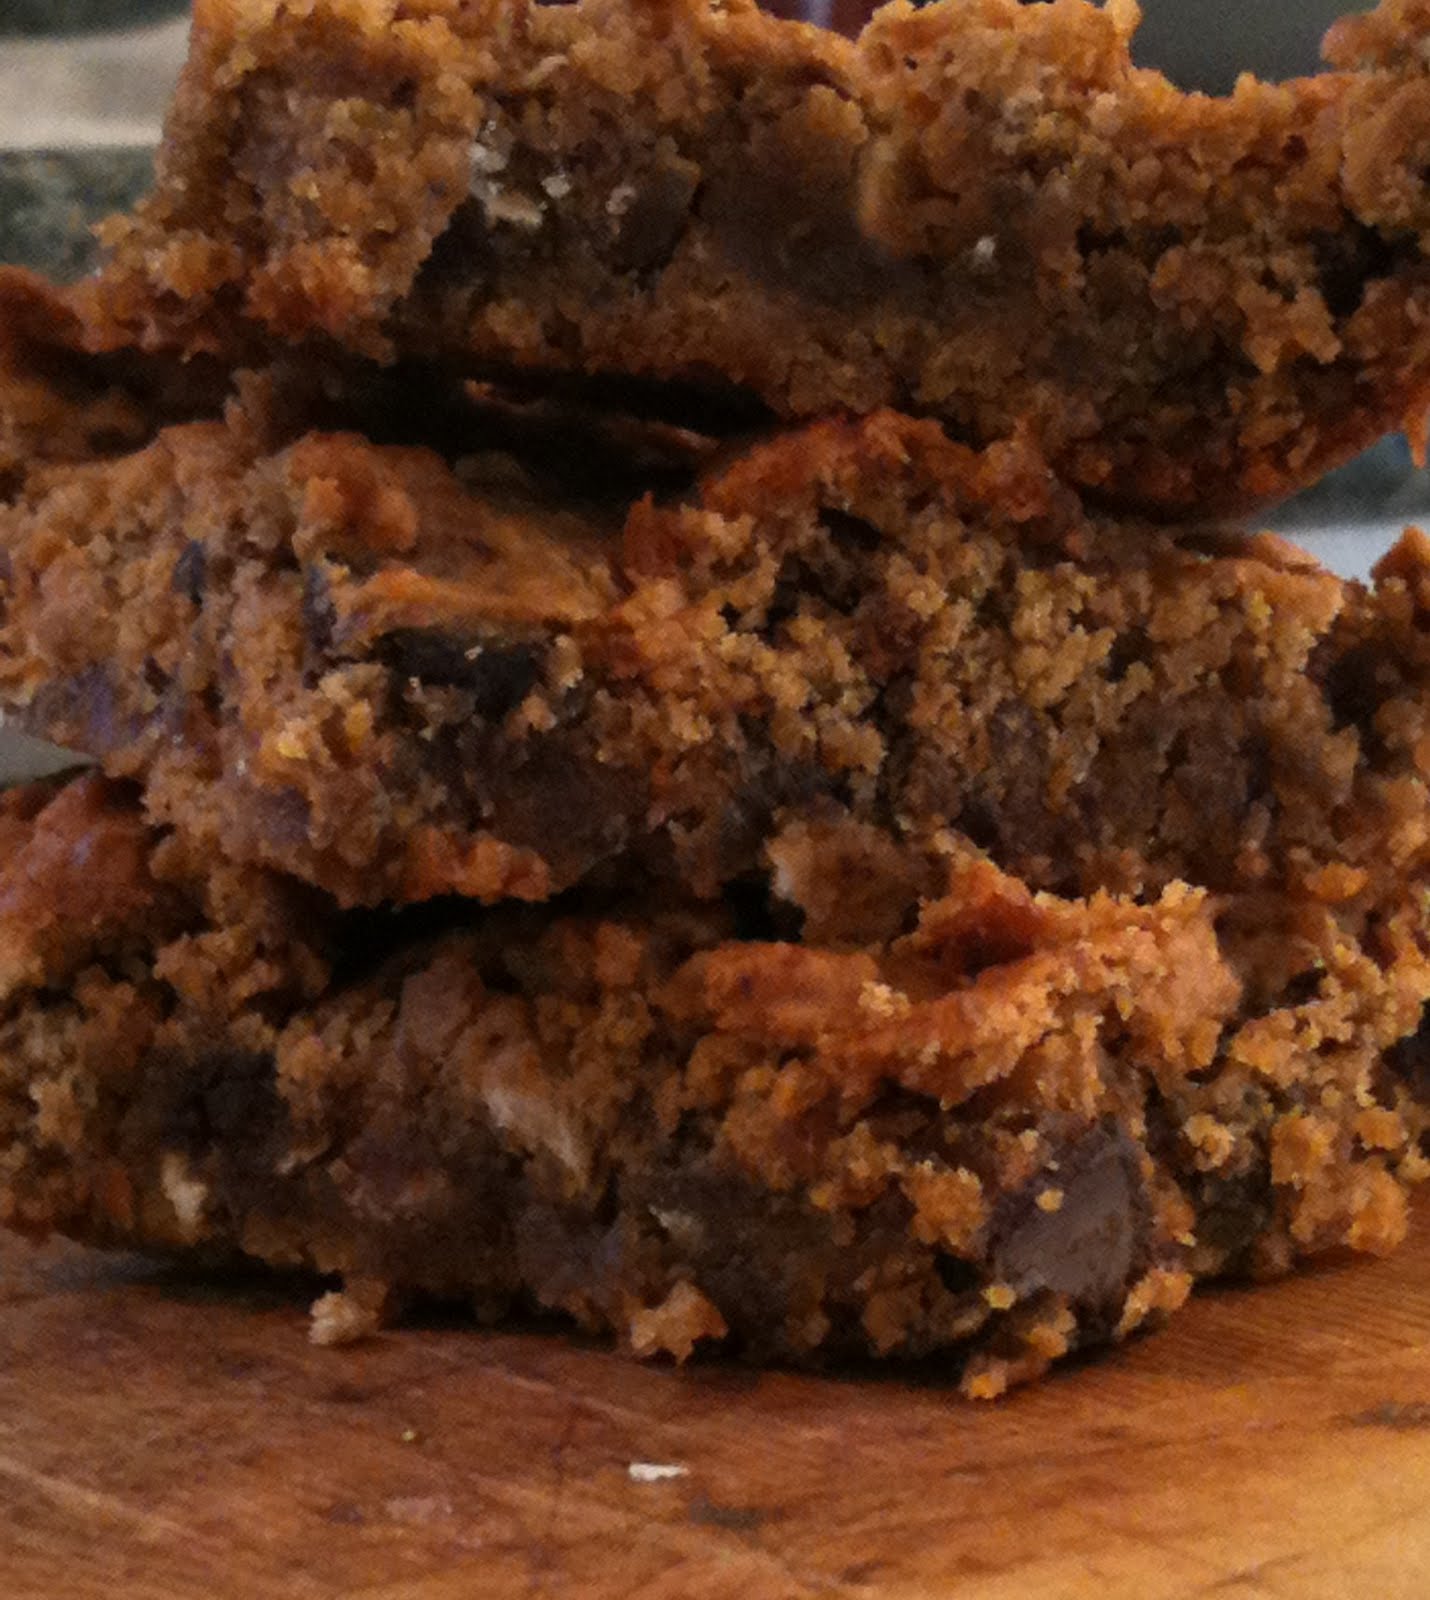
    The relevance of this is very profound, since I married a man who loves cookies as much as baseball or family.  He is powerless against even the most modestly tasty cookie- so one can only imagine how I must have felt when four years ago, after a fresh batch of nasties came out of the oven, he replied "no thank  you" without even looking me in the eyes.  NO THANK YOU? .....NO THANK YOU???? Naturally, I was furious.  I proceeded to chip the rest of the cookies off of the cookie sheet and let them shatter into the compost bin.  Then I waited..... and then these appeared.  They are perfect- chewy, but with a bit of a crispness to the edge and they stay soft until the very last cookie is gone.  They are rich and toffee-like, but not so much that you can't eat the whole batch if you are so inclined.


    The Cookies (makes 22-24 cookies: serves 1)

    Ingredients:
    • 1-3/4C unbleached all-purpose flour*
    • 1/2t baking soda
    • 14T (1-3/4sticks) unsalted butter**
    • 1/2C granulated sugar
    • 3/4C packed dark brown sugar
    • 1t table salt
    • 2t vanilla
    • 1 large egg (umbilical cords removed, obviously)
    • 1 large egg  yolk (remove these, too)
    • 1 to1-1/4C semi-sweet chocolate chips
    • 3/4 C chopped pecans or walnuts (totally optional- These don't fly in our household)
    Directions:
    1.  Preheat oven to 375 and adjust oven rack to middle position.
    2.  Line large baking sheet with parchment paper.
    3.  Whisk flour(s) and baking soda together in small/medium bowl and set aside.
    4.  Heat 10T of the butter in a small/medium skilled over medium heat until melted, about 2 minutes.  Then continue cooking with heat on med-high swirling pan continuously until butter is dark golden brown and has a nutty aroma- 1-3 minutes longer.  Remove the skillet front the heat and, using large heatproof spatula, transfer the browned butter to a large heatproof bowl.  Stir the remaining 4T butter into the hot butter until completely melted.
    5.  Add both sugars, salt, and vanilla to the bowl with the butter and whisk until incorporated.  Add the egg and yolk and whisk until mixture is smooth with no sugar lumps left, about 30 sec.  Let the mix stand and rest for 3 minutes, then whisk for 30 sec.  Repeat the process of resting and whisking 2 more times- it will become thick, shiny and smooth. 
    6.  Using spatula or wooden spoon, stir in flour mixture until just combined, then stir in chips (and nuts) until just completely combined.
    7.  Scoop in 2T heaps (I use a cookie/ice cream scooper) onto prepared sheets, leaving ample space for the cookie to spread out.  I put ~8 per sheet.
    8.  Bake cookies one tray at a time until cookies are golden brown and still puffy and edges have begun to set, but centers are still soft- about 9-12 minutes.  If you are quite particular, you can rotate the pan half way through for complete perfection.  Transfer to wire rack to cool if you think they will last that long.

    *I often mix white and whole wheat with no flavor or texture sacrifice- that makes them healthy, right?
    **If you don't have unsalted butter in your pantry, reduce the salt in the recipe by maybe 1/2 or so

    NOTE:  Important final note here.... Do not be put off by the apparent extra steps of melting the butter and such.  First of all, they are so flipping good, you will never go back once you have tried them.  Second of all, it is actually quite a time saving measure given that you no longer need to go through the arm aching steps of creaming the butter and sugars together.  Plus, while you are letting it all rest for 3 minutes, you can get all of the cleaning done and it is all a wrap when the cookies are out of the oven.  For me, it is much easier than typical recipes.  Try it!
    
    Bubblin' butter in the pan- keep swirling...
    
    Get all those browned bits!
    
    
    We all need some space
    
    Perfect?


    Valenintes greetings to all!