Pages

Tuesday, January 25, 2011

Cilantro Pesto

I am what you may call a Cilantrophobe.  While I do think it is beautiful in its leafy green state in the ground, I find the smell, taste and flavor most unpleasant.  I don't totally mind it if a little is in with my salsa, but when I bite into one of those big leafs, it is like having a big bite of soap on my chip or something.  Anyway, when cilantro showed up in my CSA box this week, I was seriously not sure what to do.  I couldn't think of any single thing that I would want to eat that I could make to use it.  However, I very much dislike wasting anything, so I decided to do what I do with parsley (only slightly less offensive than cilantro), which is make a pesto with it.  This way, when I get that recipe that calls for cilantro, I don't have to either skip it and wonder if it really made a difference- or worse yet, go buy some just to get one tablespoon for a recipe or something.  I have to admit, having parsley pesto in my freezer has made for a very handy addition to pasta salads and quinoa salads and fish and .......Anyway, I figured salt and garlic could only help the flavor and wouldn't likely conflict with any recipe I may stumble upon that would ask for the dreaded herb.  Much to my amazement and a mix of delight and shame, I found myself actually eating this out of the food processor with a spoon.  It is delicious!  This recipe is adapted from one out of my favorite cookbook by Mark Bittman called How to Cook Everything.

PS: Here is a link to the usual house fav around here: Spinach Basil Pesto
Ingredients:
  • 1 bunch cilantro leaves (top stems ok), rinsed and patted dry
  • 1 clove garlic
  • 3T olive oil
  • 1-2T freshly squeezed lime juice
  • Salt & Pepper to taste
Directions
Pulse/blend all ingredients together in blender or food processor until it is the consistency you are looking for.  I prefer it to be fairly coarsely chopped up, so I probably pulsed mine 10x at 1-2s pulses.

Optional next step to freeze in 1-2T amounts in ice cube tray for a few hours.  You can either store them in the tray, or transfer them to a different container to keep frozen.


If freezing, simply take a cube out of the freezer 10 minutes or so before use to thaw!

This will be delicious in salads, pasta salads, dressings, on fish or maybe even a marinade for pork, not to mention in salsas.....

Friday, January 21, 2011

Chicken Pot Pie (Gluten-Free/Adaptable, Dairy-Free/Adaptable)


I am delighted about this recipe!!  It is really fun to have good comfort food made on deep winter nights.  It is even more fun for me to be able to lighten them up and deglutinify them without losing flavor for a GF option.  In fact, in the batch I just made, I didn't have enough chicken, so I substituted extra-firm tofu for half of the meat and I think it was great.  If you don't do meat (of course you probably wouldn't be reading this, now would you?) or if you have a vegetarian friend you are making dinner for, you could easily substitute tofu for the chicken and maybe mushroom stock for the chicken stock and be in business.  Furthermore, I decided to freeze half of this so I could try it with pie crust and biscuits while seeing how well it held up to the freezing process and it held up beautifully!
Ingredients
Serves 6-8
  • 6 carrots, peeled and sliced into 1/4inch dice
  • 2-4 ribs celery, cut into 1/4 inch dice
  • 1 onion, chopped fine
  • 2 garlic cloves, minced or finely grated
  • 2t fresh thyme, minced (or 1/2t dried)
  • 1t vegetable oil
  • salt
  • 1/4 cup dry sherry*
  • 3c low sodium chicken broth
  • 2 bay leaves
  • 2lbs boneless, skinless chicken breasts, cut into 1 inch pieces
  • 1/4c cornstarch or flour (I used Gluten-Free flour)
  • 1/4c half & half (I used MimicCream, I bet plain almond milk would work)
  • 1c frozen green peas
  • 2T minced fresh parsley
  • 1 recipe of Cream or Buttermilk Biscuits or 1 double Pie Crust recipe
*I didn't have any dry sherry, so I used a 3:1 mix of a delicious Tawny Port and Dry Vermouth from my bar.  Worked great!

Directions
1. Adjust oven rack to middle position and preheat to 425.
2. Combine carrots, celery, onion, garlic, thyme, oil and 1/2t salt in large pot or Dutch oven.  Cover and cook over medium-low heat, stirring often, until veggies have softened, about 10-12 minutes.
3. Stir in the sherry, broth, bay leaves and chicken and bring to a simmer, stirring occasionally until chicken is no longer pink inside, about 8 minutes or so. 
4. While chicken is cooking, whisk cornstarch or flour in with the half & half or substitute of your choice.  When chicken is cooked through, add the cornstarch or flour mixture into the sauce and continue to simmer until sauce has thickened, about 1 minute or so.
5. Take filling off of heat.  Discard bay leaves and stir in the peas and parsley and salt and pepper to taste, then pour into 9x13inch pan.

***Two options to assemble and bake depending on your choice of pie crust or biscuit topping***

For Pot Pie with Biscuits:

With filling in oven safe pan, top with biscuits as shown below, then bake until biscuits are golden brown and filling is bubbly, about 20 minutes.  Let cool for 5-10 minutes before serving.


For Pot Pie with Pie Crust:
Roll crust into 11x15inch size rectangle and place over the top of the filled pan, then tuck over the edges and pinch gently to make it pretty!
Pretty pie crusts clearly aren't my thing, but this gluten-free beauty was delish!


Since I dislike fresh parsley (or worse, cilantro), during the summer, I grow a bunch of it and make various pestos and freeze them in cubes.  This way, I have something tasty and nearly fresh in a pinch year-round

This meal, like all others, is best served with the Kale salad!

Wednesday, January 12, 2011

Cream Biscuits & Buttermilk Biscuits (Gluten-Free/Adaptable & Dairy-Free Adaptable)

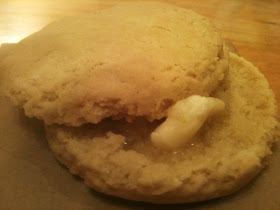
I have been making lots of biscuits lately.  I have been craving Chicken Pot Pie and wanting to get the biscuits right before pulling it off.  Also, they are super fun to make with Mia.  She loves to pat them down and smush them and mix them and fling them around.  Somehow she also discovered that the dough is delicious and now I have to restrain her from eating them all raw.

Anyway, these are easy to make, reduced in fat from the typical biscuit, fast, tasty and easily modified for the Gluten-Free or Dairy-Free eater.  So many reasons to make delicious biscuits tonight!  I'd say start-to-finish-in-my-mouth 30-40 minutes depending on how much help I get.

They are great plain or with butter and jam, honey or agave- or maybe make a breakfast sandwich with eggs and ham? yes!


Buttermilk* Biscuits: (Adapted from The America's Test Kitchen Family Edition)

Ingredients:
*A great way to sub for buttermilk is to use 1c milk mixed with 1t white vinegar and let stand for 5 minutes until thickened.  In my case, to avoid the dairy, I have used soy milk, 'whole grain drink', MimicCream and others.  All work great!

 Directions:

1.  Adjust oven rack to middle position and heat to 450.
2. Whisk flour, baking powder, baking soda and salt together in large bowl.
3. In separate bowl, whisk melted butter and buttermilk* together
4. Gently stir the buttermilk mixture into the dry ingredients and mix with spatula until just combined (do not over mix or biqs will get tough and the absolute opposite of flaky)
5. Gently roll out or pat out on floured surface until about 3/4" thick
6. With 2-1/2"biscuit cutter or upside-down cup, cut out biscuits and place on parchment lined baking sheet for 11-13 minutes, until golden brown.


Cream* Biscuits(Adapted from The America's Test Kitchen Family Edition)
Now, these are even faster and equally tasty!

Ingredients:
  Directions:

1.  Adjust oven rack to middle position and heat to 450.
2. Whisk flour, baking powder, sugar and salt together in large bowl.
3. Stir in cream until dough forms, about 30s.
4. Gently roll out or pat out on floured surface until about 3/4" thick
5. With 2-1/2"biscuit cutter or upside-down cup, cut out biscuits and place on parchment lined baking sheet for 11-13 minutes, until golden brown.


MimicCream

A great Dairy/Cream substitute for baking, cooking coffee!  Made with nuts and other Delicious goodness, this is a great allergen-free kitchen booster.

Thursday, January 6, 2011

Mac & Cheese (Gluten-free/Adaptable)

Seen here with a delightful side of Shetland Cabbage


Seriously, what is not to love about Mac & Cheese?  Forget about dairy-free here.  Just enjoy the gooey love.  Of course, I am always looking to find ways to make everything healthier and full of more redeamable qualitites, so this has lots of hidden goodies in it.  My original inspiration for adding bits and dollops of health-boosting goodness to the family's food came after taking Mia to the Naturopath about a year ago.  After a year and a half of what was certainly more than her share of colds, temperatures and coughs, we just wanted a different take on how to boost her immue system.  That is when I started making spinach pesto (a recipe to come...) and adding it to basically everything we ate.  Then I read Jessica Seinfeld's Deceptively Delicious and pretty much just started adding various diced, minced, pureed or mashed bits of veggies and other goods into everything I make.  Now, if you come eat at our house, you just might find sunchokes, squash, zucchini, carrot or spinach in your cocktail if you aren't careful, but you will certainly find it in your food!  Besides adding great vitamins and minerals to otherwise lacking meals, it is a great way to use food that might otherwise not be enough to save for a lunch or other leftover and I am a big fan of reducing waste.

Which brings me to the Mac & Cheese for tonight's recipe.  I added roasted and mashed sunchoke (formery called jeruselum artichoke) and delicata squash to it, but you certainly could add whatever you want.  I also have added minced chicken (Mia isn't a fan of protein these days) and obviously ham is a wonderful addition.  This batch also has peas, which are a personal favorite of the Peanut.  Clearly, this would be best served with the Raw Tuscan Kale Salad, but what wouldn't be?

Ingredients:
  • 1lb dried pasta (I used Trader Joe's Gluten-free Brown Rice noodles shown below, but penne, elbows, fusili or whatever you have on hand will be great!)
  • 2Tbs unsalted butter
  • 4Tbs all-purpose flour (I used Tom Sawyer's Gluten-free flour)
  • 1/4tsp nutmeg
  • 1/8-1/4tsp paprika
  • 1/2-1c vegetable puree of your choice (I used squash and sunchoke tonight)
  • 2c milk (even better to use a 12oz can of evaporated milk and 3/4c milk if you have it, it will make it unbelieveably creamy)
  • 2-1/2c shredded cheese ( I like to use a mix of Cheddar, Jack, Pecorino or Parmasean and a few tablespoons of Goat Chevre or Cream cheese.  To add a real flavor treat, put 1/4c of blue cheese)
  • 1c peas (optional)
Directions:

1. Preheat oven to 350
2. Bring a large pot of salted water to boil and cook noodles to 'al dente'.
3. While pasta is cooking, bring large saucepan to medium heat and add the butter and flour, stirring constantly untl it makes a thick paste (a 'roux') - about 1-2 minutes.
4. Add the milk and cook stirring frequently until it begins to thicken, about 3-5 minutes, then add the spices.
5. Take off of the heat and add in the puree (if using it) and the cheeses a handful at a time.  Stir or whisk continuously until smooth.
6. Add in the noodles and any other peas, ham or whatnot that you may be incorporating.
7. Pour mixture into a baking dish and cover with breadcrumbs or crumbled crackers and bake 25-30  minutes, until bubbly and golden brown.*/**

* If you are hungry and/or in a hurry, you could just skip the last step and go pot-to-plate.  You would miss the yummy crunchy topping though, and we all know that is the best part.

** This is also a great dish to split and cook half and freeze half at this step (or make a double batch).  When you are ready, take from freezer the night before and thaw in the refridgerator, then bring to temperature on the counter for 1hr prior to cooking.  You may still need to adjust cooking times based on the starting temp of the foods, but it holds really well for up to 2 months.  This also makes a great gift for those friends of yours that have a new baby at home and can use some meal help! 


Sunday, January 2, 2011

Chewy Granola Bars (Gluten-free/Dairy-full)

I meant to post this just after the Dairy-Free/Gluten-Free Chewy Granola Bars that I posted in December, but then the holidays came along and I felt like a proper cookie made more sense.  Anyway, here we are in 2011 and here is another tasty bar to add to the snack mix in  your house.

This is the dairy-full version of the regular player in our house.  I miss dairy everyday of my life.  I love this recipe and hope you enjoy it on behalf of the old me **sigh**.  It is ridiculously easy and fast.  Mia digs this one best.  Mike thinks they are equal to cookies on some days (this is a big compliment if you know him).  They are full of goodness and so darn easy to make. 

Ingredients:
  • 2c Rolled oats, gluten-free if needed (I prefer the chewiness of regular, but you can use quick)
  • 1-2c mixed dried fruit
  • 2c mixed chopped nuts (I like a mix of blanched almonds, pine nuts, pecans, cashews & soy nuts)
  • 1 can sweetened condensed milk
  • 1/2c natural peanut butter (optional, but definately recommended)
Directions:
Preheat oven to 350.

Line a 9x9 pan with parchment paper and grease or spray with non-stick spray. 

In large bowl, mix oats, nuts & fruit. Pour sweetened condensed milk in and mix.  If using peanut butter, mix this with the milk first for more uniform action.

Pour the mix into your prepared pan and pat down.  Cook for ~30 minutes, 'til lightly browned around sides and top.  It may still seem a bit gooey.

Dairy Delicious on The L, Dairy-Free on the R